Moving the Ramp Visualization in Unity
The ramp prefab has three different movements that need to be visualized in Unity:
- Rotation: The ramp rails, the ramp/shaft adapters, and the main shaft of the ramp will rotate while the base of the ramp remains stationary.
- Elevation: The elevation plate (which includes the drop bar) has to move up and down in the direction of the ramp rails. By extension, the shaft of the elevation actuator must move up and down as well.
- Drop Bar: The drop bar must open and close by rotating about an axis aligned with the shaft of the drop bar motor.
Note: This is based on what was done for the ramp movement demo, which was just to demonstrate the movement of the ramp visualization. The actual structure will be slightly different from what is implemented into the actual Boccia Unity application in RampPresenter.cs, BocciaModel.cs, SimulatedRamp.cs, etc.
Rotation
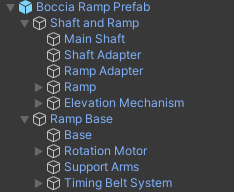
Since ramp rails, the ramp/shaft adapters, and the main shaft of the ramp will rotate while the base of the ramp remains stationary, I created two empty GameObjects as children of the Boccia Ramp to organize the other child components. Essentially, everything that rotates was moved into the empty GameObject called “Shaft and Ramp.” The ramp base components were moved into the empty GameObject called Ramp Base (see the updated hierarchy in Fig. 1).
To visualize the rotation, a GameObject rotationShaft was declared in the script. The Shaft and Ramp GameObject was declared as rotationShaft. Due to the orientation of the ramp shaft GameObject, the rotation movement involves changing the y-angle of the local transform, i.e. the rotation angle is defined by rotationShaft.transform.localEulerAngles.y
For the Ramp Movement Demo, the variable targetRotation represents the new rotation angle that the ramp visualization must move to. Due to the limitations of the physical ramp, the ramp’s rotation angle must be confined to a specific range. For the demo, that range is from -80 degrees (rotation to the left) to +80 degrees (rotation to the right). The targetRotation variable is a property that is clamped in this range every time it is set to a new value.
[SerializeField]
private float _targetRotation;

public float targetRotation
{
  get { return _targetRotation; }
  set
  {
    // Clamp targetRotation between min and max values
    value = Mathf.Clamp(value, minRotation, maxRotation);
    _targetRotation = value;
  }
}

private void OnValidate()
{
  targetRotation = _targetRotation;
}
Note: Clamping the rotation value has not yet been implemented into the actual Boccia Unity project. The RampPresenter will simply visualize the rotation, and it should not matter what the limits are for the visualization - the rotation range would be controlled elsewhere.
In the demo, the value of targetRotation can be updated by one of two methods:
- Increase/decrease the targetRotation angle by an increment, where the increment is a negative value for rotating left, and a positive value for rotating right. For example:
public void RotateBy(float increment)
{
  targetRotation += rotationIncrement
}
- Update the targetRotation angle to a new degree value. For example:
public void RotateRamp(float degrees)
{
  targetRotation = degrees;
}
The Quaternion.Lerp() linear interpolation function is used to create a smooth movement between the current angle and the new targetRotation. Note: the following code was part of the Update() method in the Demo, but was implemented in the presenter(s) to occur when if the model sends a change event (i.e. it does not need to occur every frame).
Quaternion currentRotation = rotationShaft.transform.localRotation;
Quaternion targetQuaternion = Quaternion.Euler(rotationShaft.transform.localEulerAngles.x, targetRotation, rotationShaft.transform.localEulerAngles.z);
Quaternion newRotation = Quaternion.Lerp(currentRotation, targetQuaternion, rotationSpeed * Time.deltaTime);
rotationShaft.transform.localRotation = newRotation;
Elevation
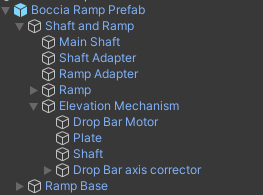
The elevation plate (which includes the drop bar) has to move up and down in the direction of the ramp rails. By extension, the shaft of the elevation actuator must move up and down as well. Within the “Shaft and Ramp” parent GameObject, I created an Elevation Mechanism empty GameObject as a child component. The parts of the ramp that move for elevation are children of Elevation Mechanism (see Fig. 2 for the hierarchy).
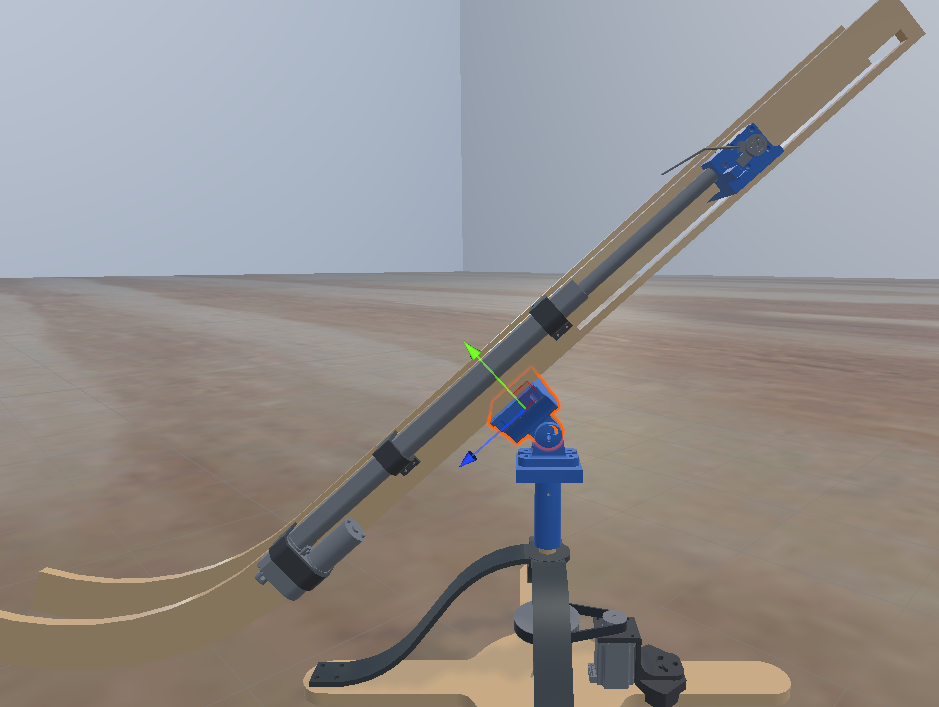
The direction of the elevation mechanism must be defined by a vector aligned with the straight section of the ramp’s rails. The Ramp Adapter GameObject (the part that mounts the ramp onto the shaft) is normal to this direction, and so its z-axis is parallel to the direction of motion (see Fig. 3).
The Ramp Adapter z-axis is converted to the local space of the parent object of the elevation mechanism (which is the Shaft and Ramp GameObject). This ensures that the motion of the elevation mechanism stays consistent no matter how the Shaft and Ramp is oriented, i.e. the elevation mechanism will always move along the ramp rail, even if the ramp’s rotation changes. The following code shows the initialization of the elevationDirection Vector3 variable in the Start() method.
void Start()
{
  // Store the rampAdapter's z-axis
  Vector3 rampDirection = rampAdapter.transform.forward;

  // Convert the rampAdapter's z-axis to the local space of elevationMechanism's parent, multiplied by -1 to reverse the positive direction
  elevationDirection = elevationMechanism.transform.parent.InverseTransformDirection(rampDirection) * -1;
}
Elevation will be represented by a percent value that corresponds to the distance along elevationDirection within the range of minimum to maximum elevation. Similar to rotation, for the Ramp Movement Demo, the targetElevationPercent property was clamped to a range of 0-100%.
Note: Clamping the elevation value has not yet been implemented into the actual Boccia Unity project. The RampPresenter will simply visualize the elevation, and it should not matter what the limits are for the visualization - the elevation range would be controlled elsewhere.
In the demo, similar to rotation, the value of targetElevationPercent can be updated by one of two methods:
- Increase/decrease the targetElevationPercent value by an increment, where the increment is a negative value for moving down, and a positive value for moving up. Note: The ElevationMechanism GameObject is positioned halfway up the elevation range, i.e. 50% is the original elevation when Play Mode is entered.
- Update the targetElevation percent to a new value.
To visualize the elevation movement, the targetElevationPercent variable first must be converted from a percent into a scalar value. Then, it is converted to a value that represents its actual distance along elevationDirection.
float elevationScalar = minElevation + (targetElevationPercent / 100f) * (maxElevation - minElevation); // Convert percent elevation to its scalar value
Vector3 targetElevation = elevationDirection * elevationScalar;
The Lerp() function was used to create a smooth movement from the current elevation to the new target position.
elevationPlate.transform.localPosition = Vector3.Lerp(elevationPlate.transform.localPosition, targetElevation, elevationSpeed * Time.deltaTime);
Drop Bar
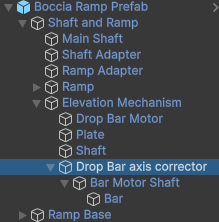
The drop bar must open and close by rotating about an axis aligned with the shaft of the drop bar motor. However, the local axes of the drop bar GameObject and/or its motor shaft are not aligned in the correct direction. To correct the axes, I added an empty GameObject (Drop bar axis corrector) and positioned/oriented it so that its x-axis is aligned along the motor shaft. Then I made the bar motor shaft a child of the Drop bar axis corrector. The bar itself was made a child component of the bar motor shaft (see Fig. 4 for the hierarchy).
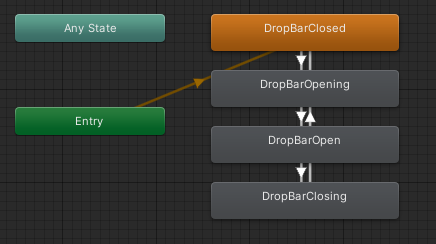
The drop bar open-and-close movement was done using an animation since it will be the same motion every time the Drop button is selected. The animation is the same as it was in the old Boccia Unity application. The Animator uses a bool isOpening to switch between the different animation states. When isOpening is true, it triggers the transition between the DropBarClosed state and the DropBarOpening state.
The animation is handled with a coroutine to toggle the state of isOpening.
private IEnumerator DropBall()
{
    barAnimation.SetBool("isOpening", true);
    yield return new WaitForSecondsRealtime(1f);
    barAnimation.SetBool("isOpening", false);
    yield return null;
}