Original Ui
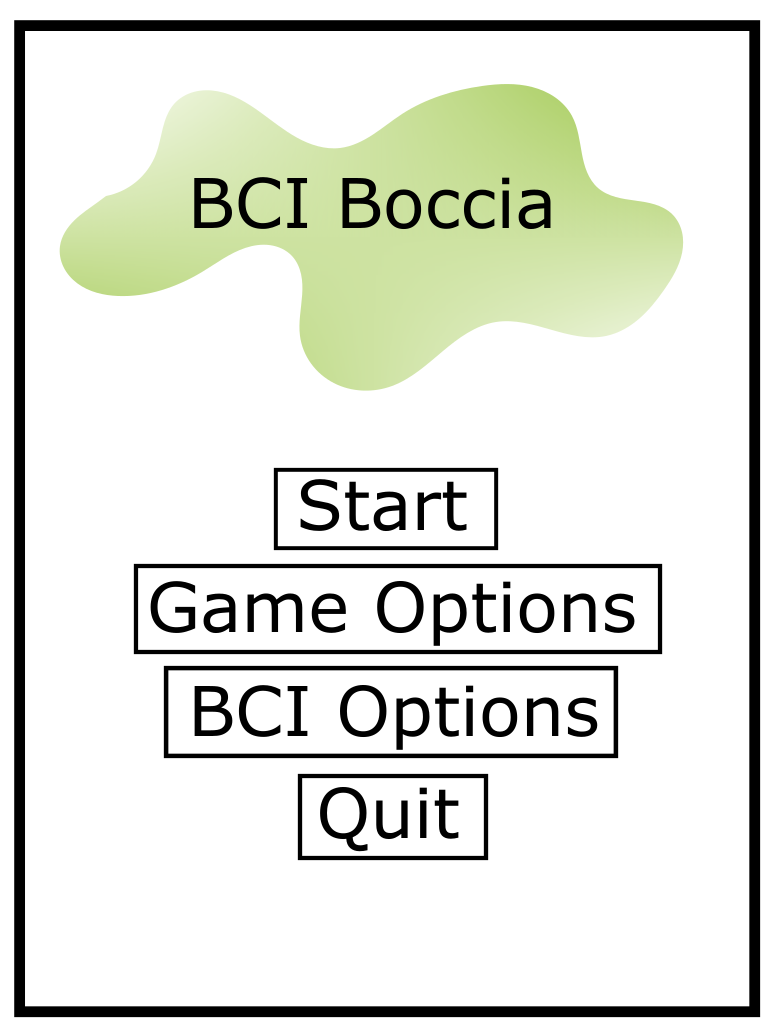
Start Menu
We need to decide on a font and a logo.
- Eli usually makes logos so maybe he has this, but maybe Dan has something in mind.
Dan and I decided on separate buttons for the 2 options menus.
I don’t think we need anything else on the start menu but I am open to suggestions.
- Start Button goes to setup menu.
Options Menus
BCI Options:
- In the first iteration of this software (this Tick cycle), the only paradigm available will be P300. This will hopefully be expanded to include SSVEP in the future.
- If the ‘Sham feedback’ box is ticked, the ‘target selected animation’ will become active (text will turn black and dropdown can be opened).
- All options will be aligned on the left except the ‘target selected animation’, I don’t know why they look like that in the picture.
- Will num flashes/num training windows be a dropdown or an input box with preset minimum, maximum, and default values?
- EKL - We should do an input box here, with just some small guardrails for min/max/default values. This won’t be difficult, and if they enter anything outside of these guardrails, it will automatically set it to another value.
- What will the training target and target selected animation options be?
- EKL- We can decide on these - most likely we will want to offer a range down the line with support from players, where they can personalize this option. For now, we can do a couple standard “juicy” animations, such as object resizing, subtle movements, subtle recoloring (transparency changes).
- Is there a better word for ‘Testing’?
- Maybe ‘Play’ or ‘Game’?
- EKL - Game Options?

Game Options:
- All options will be aligned on the left I don’t know why they look like that in the picture.
- Elevation fine control % represents the step size of elevation change when using fine control to adjust elevation. This should be a valuable between 1-5%. Should we have a dropdown or a text input with min/max/default?
- Elevation fine control range represents the total % range of the elevation control. We need to talk about options here. The ability to control fine control % (i.e. step size) and range % means there will be a variable amount of SPOs depending on the combination chosen.
- Rotation fine control º and range is similar ^.
- For the operator, elevation and rotation speed decide the speed the physical ramp will move when the operator (i.e. clinician/parent/helper) uses the hotkeys to move the ramp. Holding the appropriate key will continuously move the ramp at the chosen speed.
- In terms of hotkeys, I have presented some options of things we might want to control with the keyboard. Any of these can be deleted and any can be added.
- Is the way I have Ramp movement hotkeys displayed clear?
- Need to decide on defaults for all hotkeys. I am thinking:
- Drop Ball: B
- Hide/Unhide UI: H
- Start Training: T
- Start Play: P
- Back: B
- Down: S
- Up: W
- Left: A
- Right: D

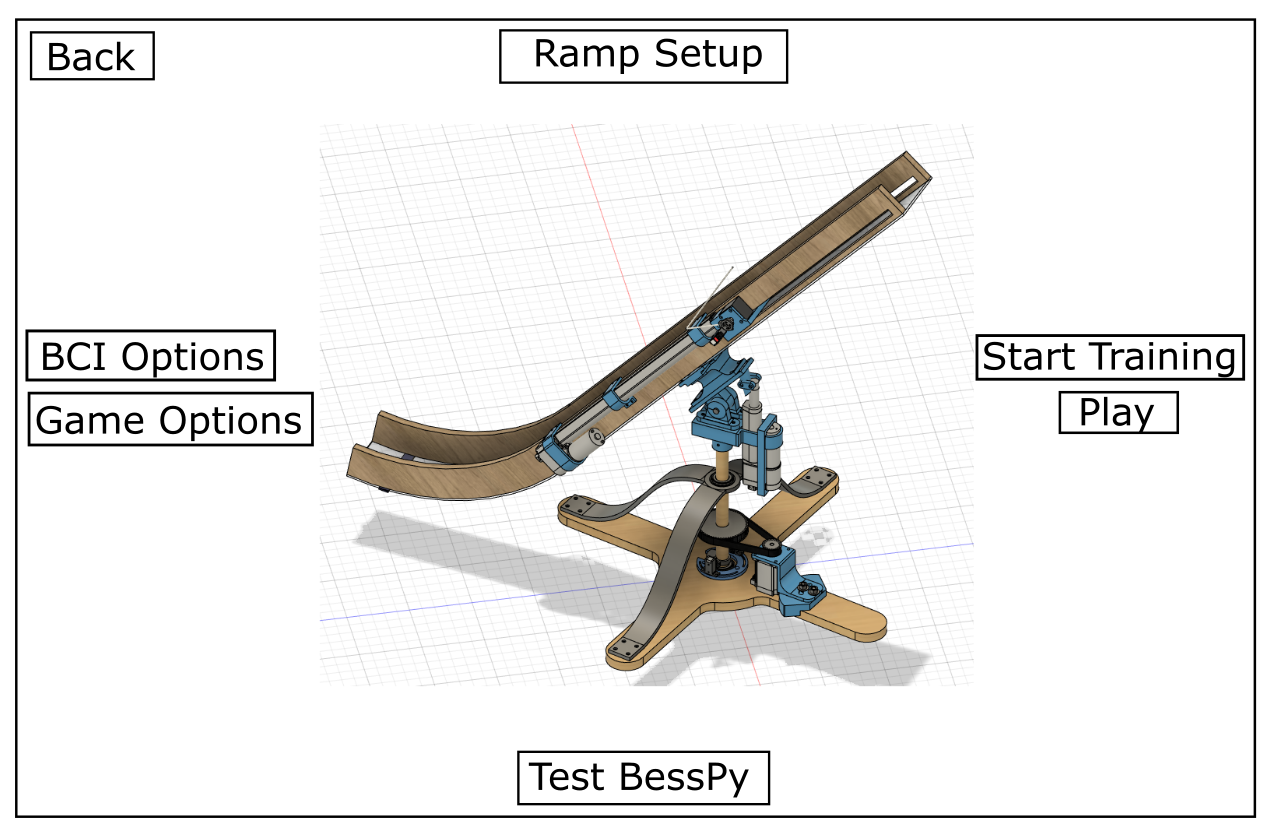
Setup Menu
-
Back button goes back to the Start Menu.
-
Ramp Setup goes to the Ramp Setup Menu
-
Both options menus go to the corresponding pages.
-
Test BessyPy does something that I am not sure of. If it is text feedback, we can display that right above the button. If it is more complicated and we need another page, I will make a mockup when I get the details.
- EKL - We will want this to just make sure that Python is connected and going. Can be more subtle as needed.
-
Start training goes to the training page.
-
Play goes to the Play Menu.
-
Initially, the Start training and Play buttons will be disabled.
- After the ramp is setup and Bessy is tested, the Start Training button will be enabled.
- Training will be completed and when done, will direct back to this page where the start button will be enabled.
-
We need a ‘Hide Ramp’ button- should it be on this page, or the play menu?
- EKL- Can you explain what you mean?
-
If ramp is visible, it will be a side view like displayed.
- EKL - Been thinking about this, and I think this could be visually more cohesive - will do a couple of mock-up to show what it could look like. One option would be just have the ramp on one side of the screen, and the options on the other side of the screen.
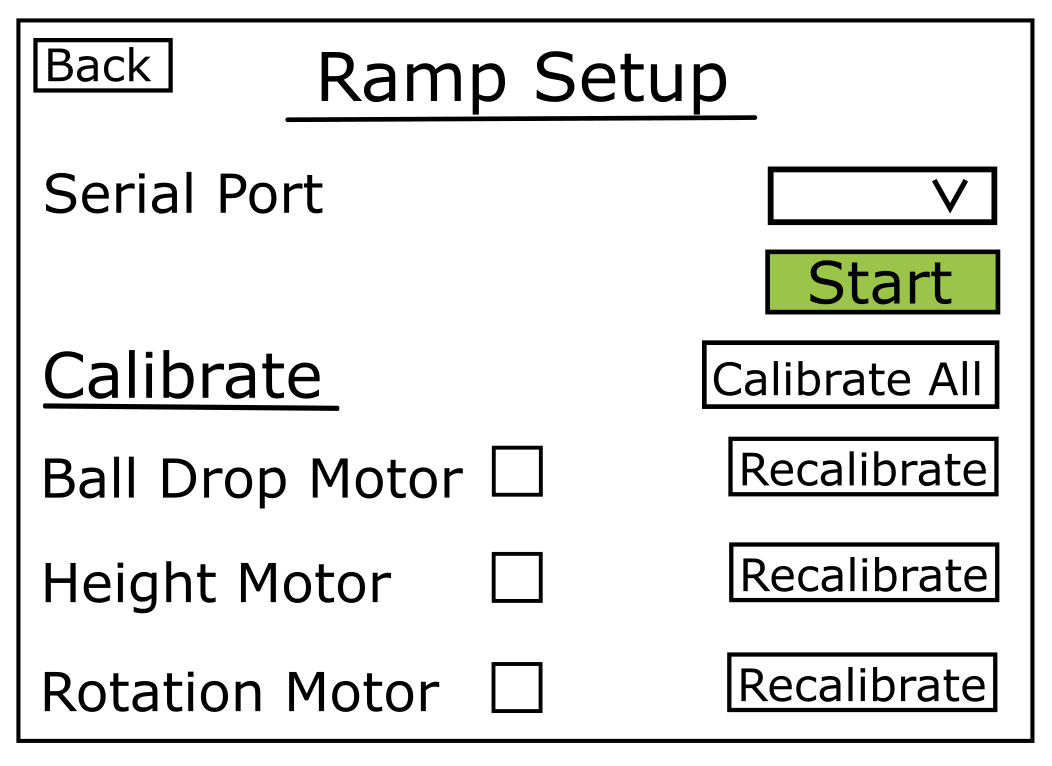
Ramp Setup Menu
- Dropdown to select the serial port the ramp is connected with. Once port number is selected, start button will be pressed to connect- maybe the button should say ‘Connect’ instead of ‘start’.
- Calibrate All button will attempt to calibrate all 3 motors at once. A status (failed or succeeded) represented by a green check or a red X will populate the boxes after each motor name.
- If any of the motors failed to calibrate when ‘Calibrate All’ was pressed, the individual motors can be calibrated by pressing the corresponding ‘Recalibrate’ button.
- When all motors are successfully calibrated, the back button will navigate back to the Setup Menu.
- maybe this should be a ‘Done’ button that is positioned somewhere else, rather than a ‘back’- I think this better indicates that you did something when you were on this screen.
Play Menu
- All Blue buttons are SPOs, total on this page = 7.
- Back button goes back to the Setup Menu
- The Height/Rotation/Height + Rotation Menus go to their corresponding pages
- The random drop button- randomly moves the ramp height/rotation and drops a ball. This will serves as the ball the user will then aim toward. (I am not 100% certain on this)
- Reset ramp position resets the height and rotation to the default values
- Need to decide on these
- The Drop button will drop the ball. From here, I believe the camera angle will change and follow the ball from behind to see where is goes.
- Will the view on the Play menu always be from the same height/perspective? Or will the view reflect the changes made in the height/rotation/height + rotation scenes?

Height Menu
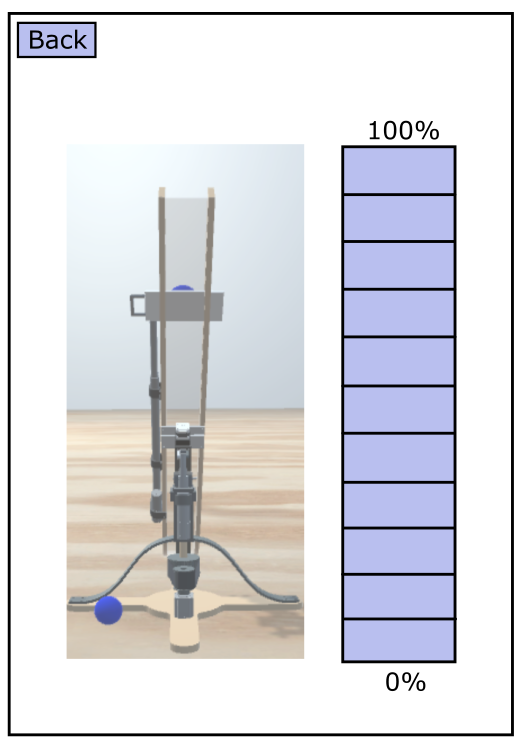
If the ‘Height’ menu is selected first (and not the height + rotation scene), this will be displayed. There are 12 total SPOs (the back button and 11 boxes in a stack). The 11 SPOs will flash and the use can select what % of height they want to move the ramp to.
- Maybe add more labels? 70? 50? 30?
- Do we want the SPO stack on the left or right of the ramp?
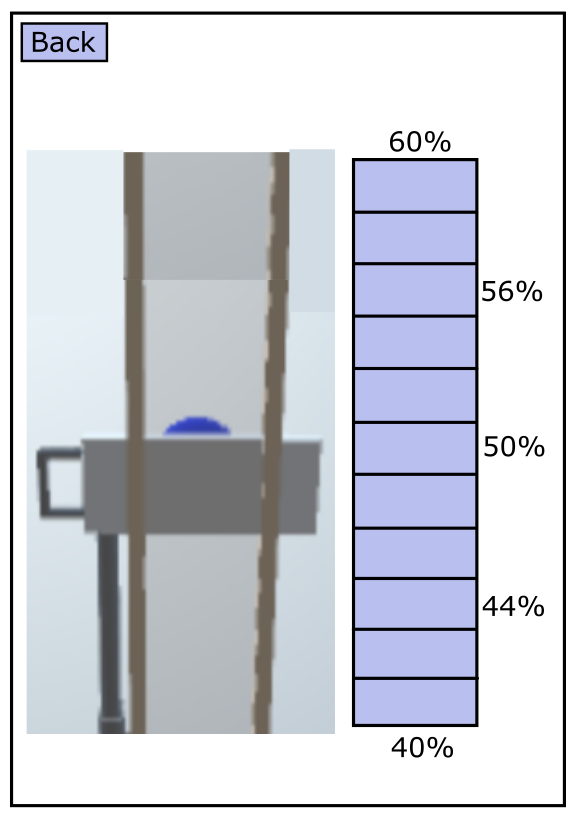
- If the height menu is selected after the height + rotation menu, a zoomed in view of the ramp will be displayed with a range of % dictated by the height selected on the height + rotation menu, the fine control %, and the fine control range.
- Here is what it would look like for a selected height of 50%, a fine control % of 2, and a fine control range of 20.
- The zoomed in ramp is a little rough, but that is the general idea.
- Flashing will operate the same as the above (choosing height first).
Rotation Menu
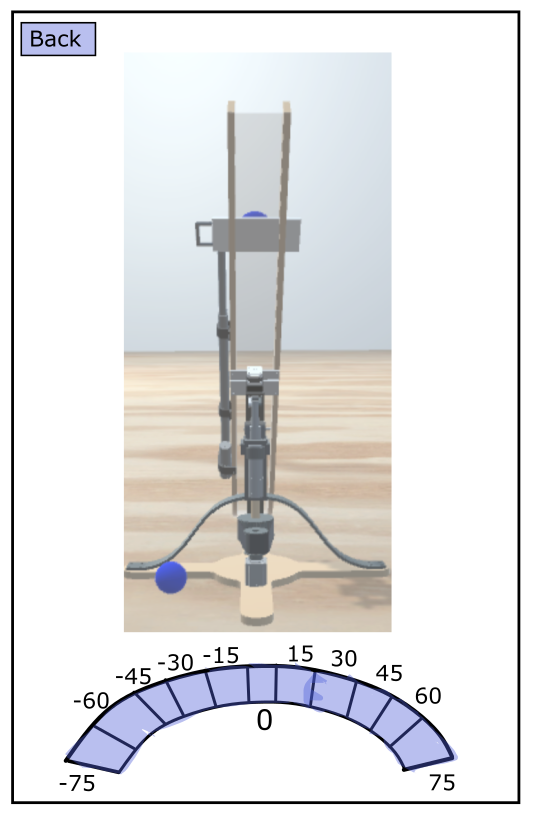
If the Rotation menu is selected first (before the ‘height + rotation’ scene), this will be displayed. There are 12 total SPOs.
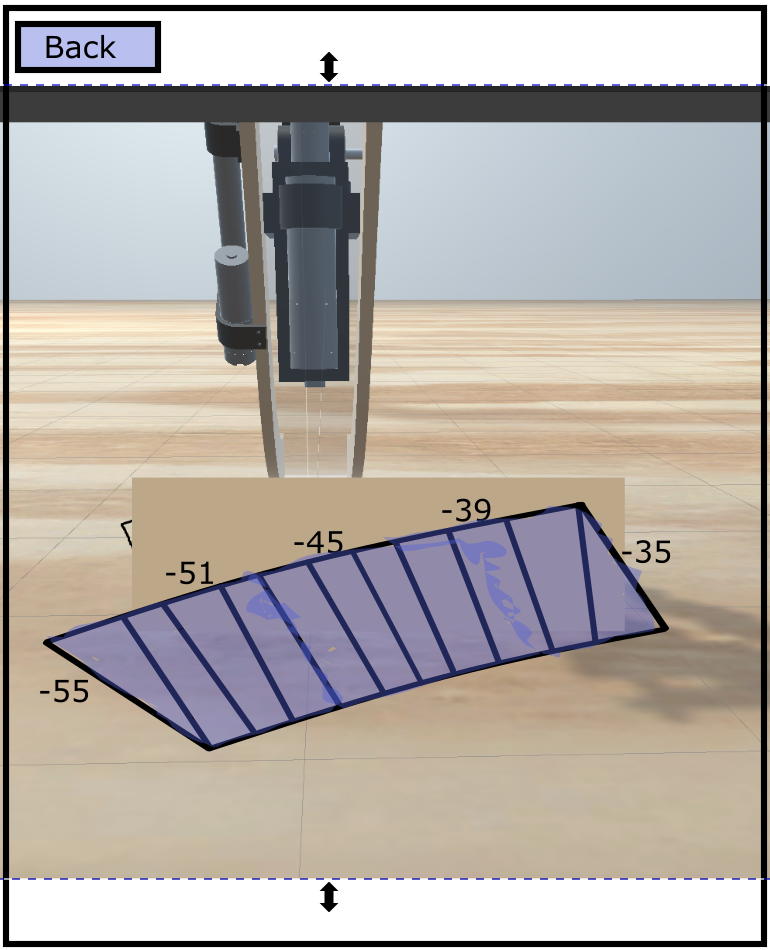
- If the rotation menu is selected after the height + rotation menu, a zoomed in view of the ramp will be displayed with a range of º dictated by the rotation selected on the height + rotation menu, the fine º, and the fine control range.
- Here is what it would look like for a selected rotation of -45%, a fine control % of 2, and a fine control range of 20.
- The ramp view is roughly what we want (from the bottom), but for this example it should be rotated to the left to reflect the -45º.
- The SPOs should reflect the ‘slice’ of the arc that we are zoomed in to.
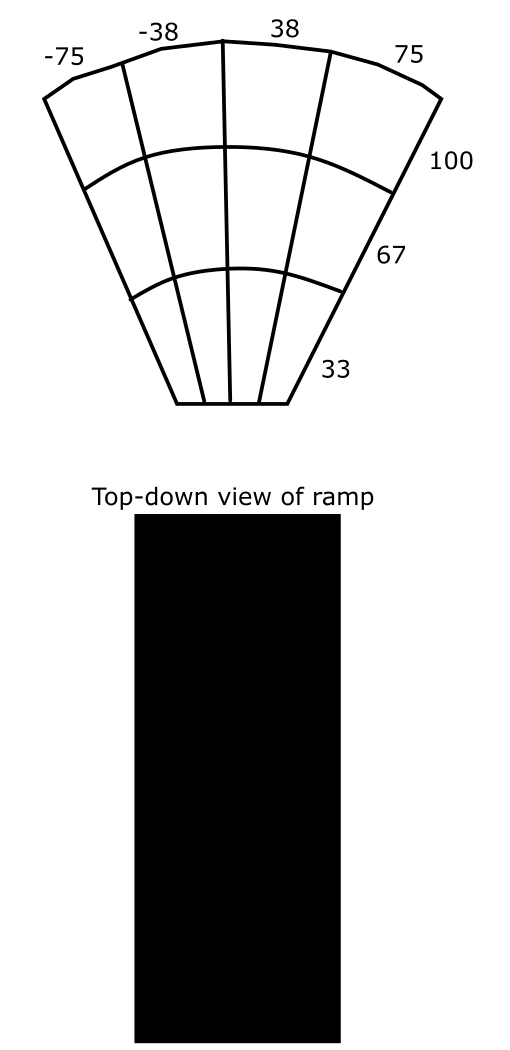
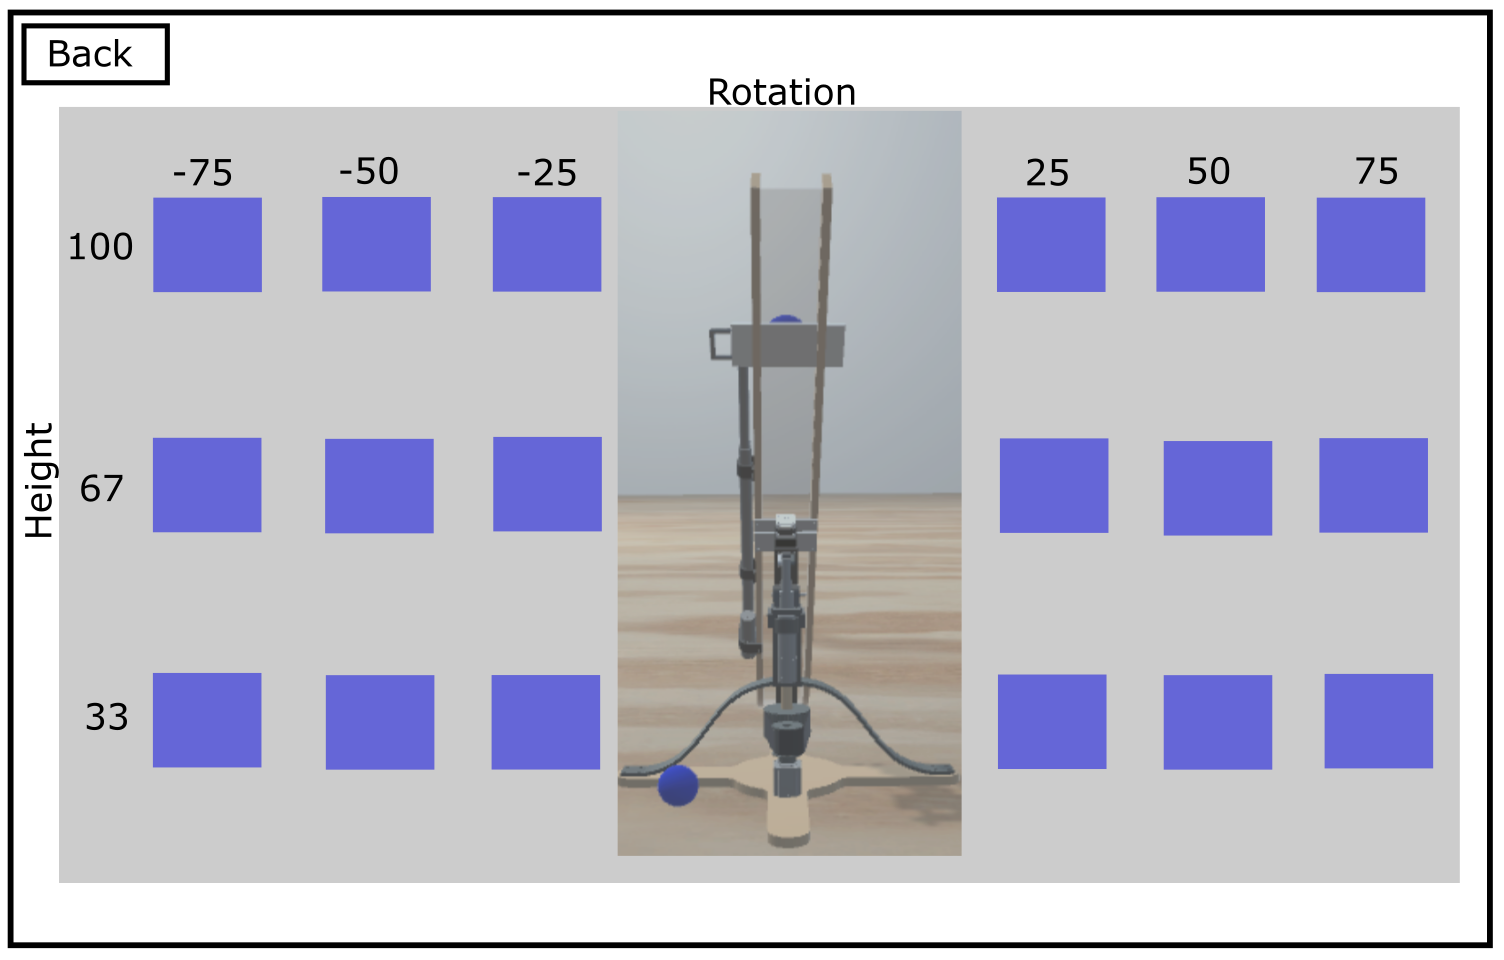
Rotation + Height Menu
This is a tricky one with a few options.
Option 1:
- Full range of rotation is -75-75º
- Full range of height is 0-100%
- This option has a back view of the ramp
- The back button is also an SPO so there is a total of 19 SPOs on this screen
- Exact grids on each side (º and % increments subject to change)
- This option makes a lot of sense when rationalizing the digital and the physical ramp in your mind. Reflects movement of the ramp more than Option 2.
Option 2:
- This one uses a different array [cone] of SPOs (again the ranges are subject to change)
- The cone can be displayed above or below the ramp
- This option has a top down view of the ramp (I don’t have a visual). This is good for visualizing where the ball will go, but harder to picture when comparing the digital and physical ramp.