Unity Contribution Set Up Best Practices
This is taken from Unity Resource E-Book and some other online spaces, but outlines some general best practices for setting up a new Unity Project, particularly if you are going to be collaborating with others.
Organization
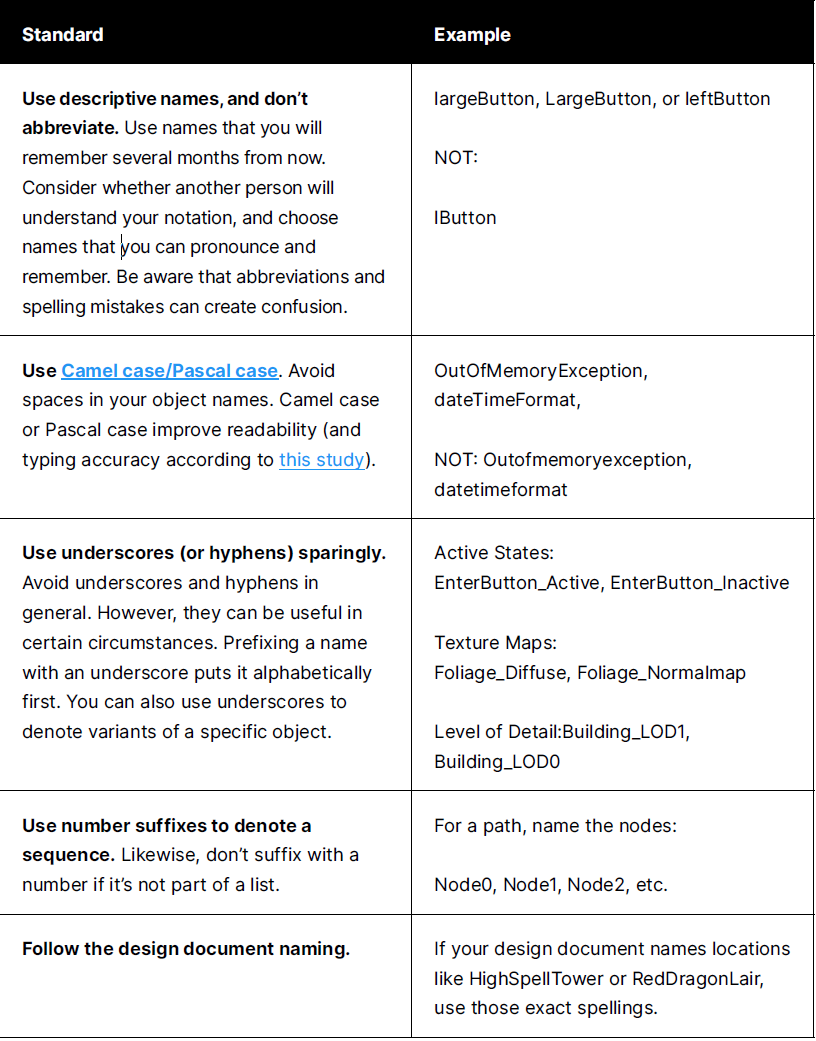
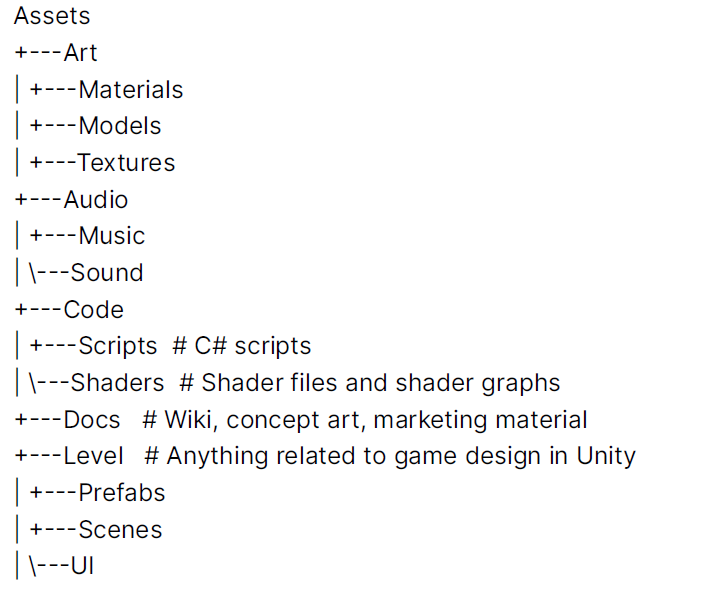
While there is no set folder structure, it is good to stick to some of the “common” principles, such as splitting up the project based on asset type (e.g. Art/Music/Code etc.). Here is a good example of one of the ways to organize your project.
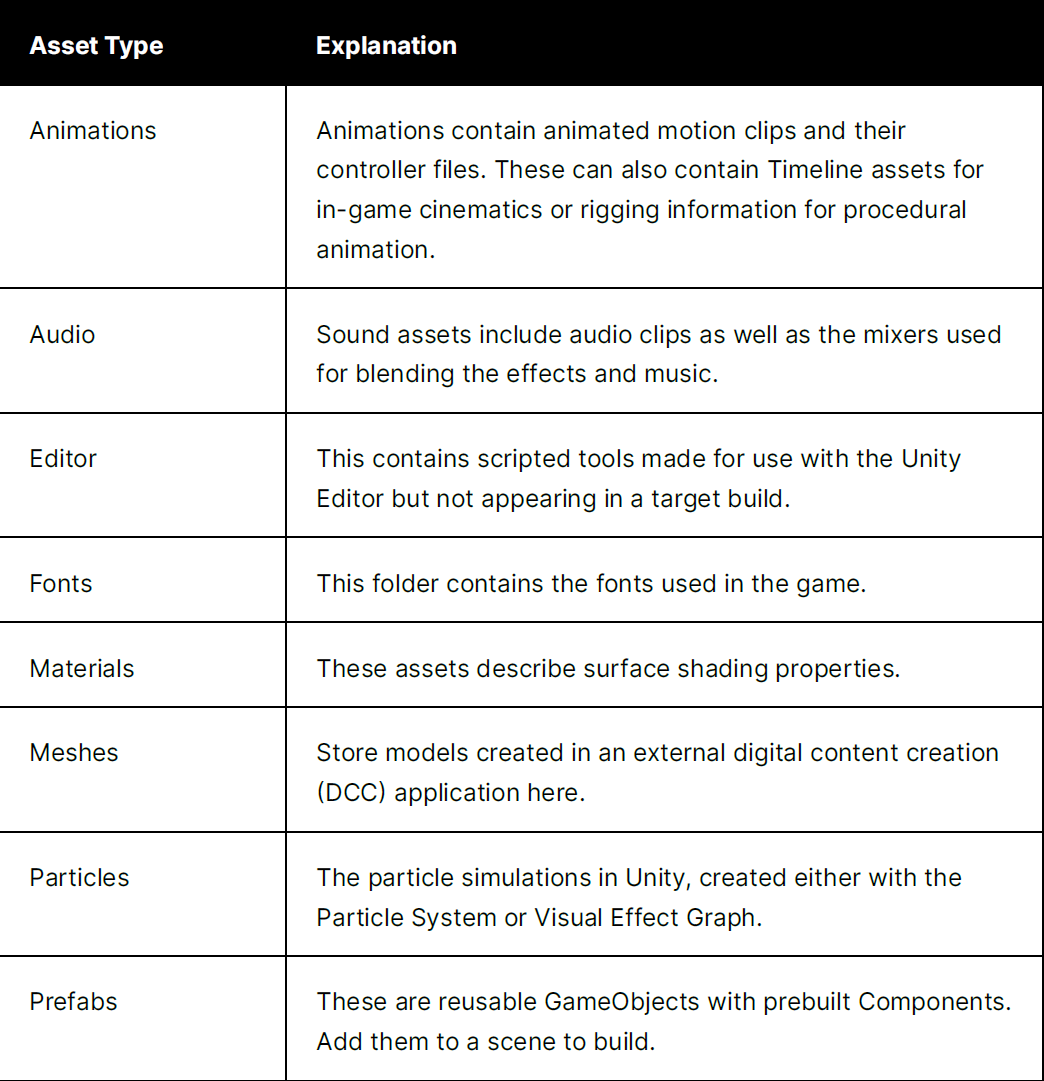
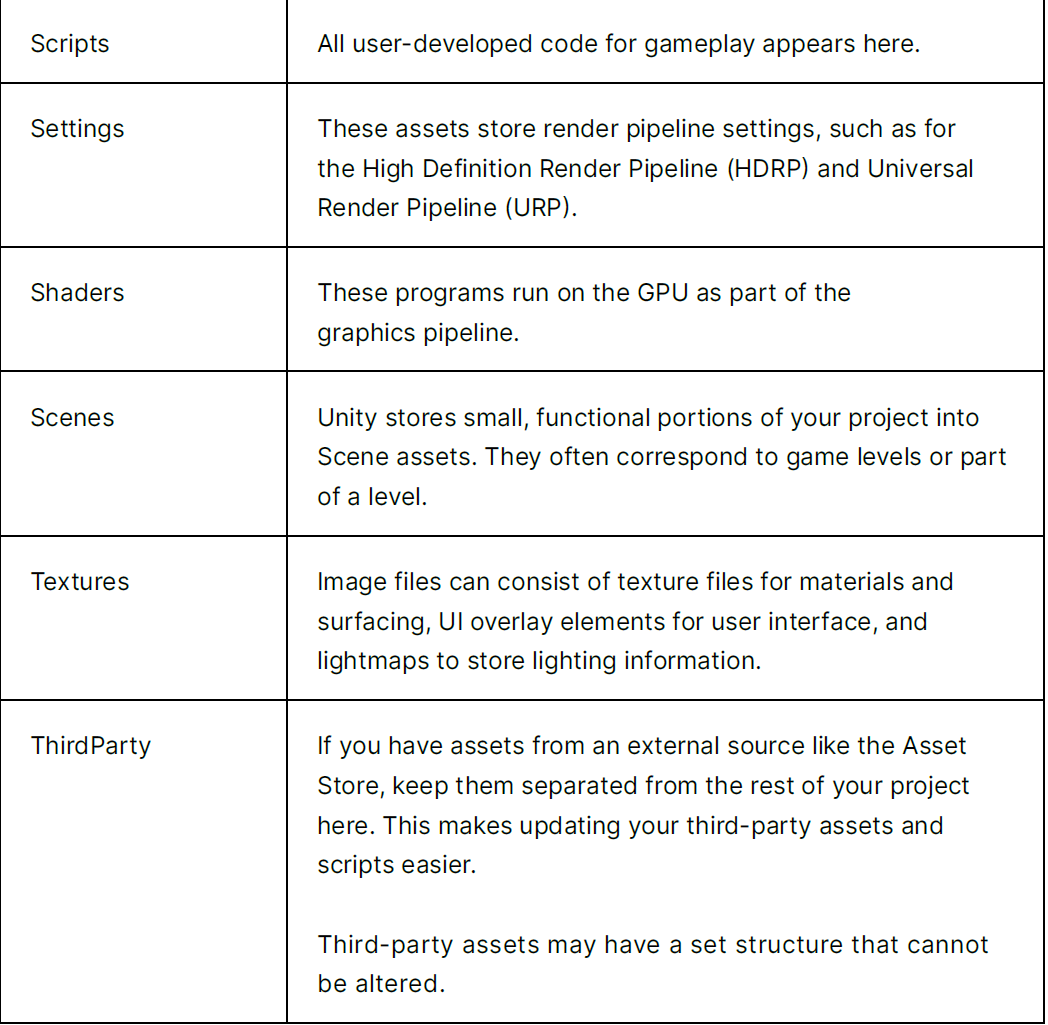
Here are also some of the definitions you might come across for the different asset types:
Workflow Optimization
When moving any files IT IS IMPERATIVE YOU MOVE IT IN UNITY ITSELF otherwise you will lose the .meta file that is associated with the object, and can cause significant problems for version control!
Unity generates a .meta file for every other file inside the project, and while it’s typically inadvisable to include auto-generated files in version control, the .meta file is a little different. Visible Meta Files mode should be turned on in the Version Control window (unless you’re using the built-in Plastic SCM or Perforce modes).
Aside from how and where you keep your assets inside the Assets folder, there are several design and development choices you can make to help speed up your workflow, especially when you’re using version control.
- Split up your assets
Large, single Unity scenes do not lend themselves well to collaboration. Break your levels into many smaller scenes so that artists and designers can collaborate better on a single level while minimizing the risk of conflicts. - At runtime, your project can load scenes additively using SceneManager.
LoadSceneAsync passing the LoadSceneMode.Additive parameter mode. - Additionally, break work up into Prefabs where possible. If you need to make
changes later, you can change the Prefab rather than the scene it’s used in to
avoid conflicts with anyone working on the scene. Prefab changes can often be
easier to read when doing a diff under version control. - And if you end up with a scene conflict, Unity also has a built-in YAML (a humanreadable,
data-serialization language) tool specifically for merging scenes and
Prefabs. For more information, see Smart merge in the Unity documentation. - See this talk about Git & Unity if you want more in depth information - https://www.youtube.com/watch?v=ISW2nS_v3Ic&t=753s
Prefabs
- Use empty game objects as scene folders. We can carefully organize these objects to make things easier to find and manipulate
- Use prefabs! Instead of just having objects exist as singularly referenced objects in the scene, we want to make them as prefabs. This can help us a lot to avoid merge conflicts, so that when things get changed we don’t constantly run into these giant, awkward merge nightmares. This includes the empty game objects above! So that changes to the prefab are the only thing that is updated, rather than the whole scene.
- We want to minimize the number of times we commit the “Unity Scene” itself (i.e. changes to that), and make changes directly to (relevant) prefab objects!
- As long as you are updating the prefab and not moving it around, it can avoid a number of the issues that come up when merging scene changes.
- Putting maintenance or other “not actively used” prefabs of empty game objects at position 0,0,0 can be helpful so we don’t run into potential problems with local/world space.
- Some advice from others:
Use prefabs for everything. The only game objects in your scene that should not be prefabs should be folders. Even unique objects that are used only once should be prefabs. This makes it easier to make changes that don’t require the scene to change. (An additional benefit is that it makes building sprite atlases reliable when using EZGUI).
Use separate prefabs for specialisation; do not specialise instances. If you have two enemy types, and they only differ by their properties, make separate prefabs for the properties, and link them in. This makes it possible to
- make changes to each type in one place
- make changes without having to change the scene.
- If you use the same prefab in different places with different parameters, it’s very easy to click
Applyand change the value of instances you don’t want to. If you have too many enemy types, specialisation should still not be made in instances in the editor. One alternative is to do it procedurally, or using a central file / prefab for all enemies. A single drop down could be used to differentiate enemies, or an algorithm based on enemy position or player progress. For example, you spawn enemies using code, then set its parameters using master data Link prefabs to prefabs; do not link instances to instances. Links to prefabs are maintained when dropping a prefab into a scene; links to instances are not. Linking to prefabs whenever possible reduces scene setup, and reduce the need to change scenes.An exception to this rule is UI setup. The link between Controllers and its UI can be instance to instance since it only occurs in 1 scene. Also, try to avoid reusing a specific controller between scenes. As far as possible, establish links between instances automatically. If you need to link instances, establish the links programmatically. For example, the player prefab can register itself with the GameManager when it starts, or the GameManager can find the Player prefab instance when it starts. Don’t put meshes at the roots of prefabs if you want to add other scripts. When you make the prefab from a mesh, first parent the mesh to an empty game object, and make that the root. Put scripts on the root, not on the mesh node. That way it is much easier to replace the mesh with another mesh without loosing any values that you set up in the inspector. Use linked prefabs as an alternative to nested prefabs. Unity does not support nested prefabs, and existing third-party solutions can be dangerous when working in a team because the relationship between nested prefabs is not obvious. Use safe processes to branch prefabs. The explanation use the Player prefab as an example.Make a risky change to the Player prefab is as follows:- Duplicate the Player prefab.
- Rename the duplicate to
__Player_Backup. - Make changes to the Player prefab.
- If everything works, delete
__Player_Backup.Do not name the duplicatePlayer_New, and make changes to it!Some situations are more complicated. For example, a certain change may involve two people, and following the above process may break the working scene for everyone until person two finished. If it is quick enough, still follow the process above. For changes that take longer, the following process can be followed: - Person 1:
- Duplicate the Player prefab.
- Rename it to
__Player_WithNewFeatureor__Player_ForPerson2. - Make changes on the duplicate, and commit/give to Person 2.
- Person 2:
- Make changes to new prefab.
- Duplicate Player prefab, and call it
__Player_Backup. - Drag an instance of
__Player_WithNewFeatureinto the scene. - Drag the instance onto the original Player prefab.
- If everything works, delete
__Player_Backupand__Player_WithNewFeature.
Scenes
- Rather than working on one scene with lots of changes, we can do “additive scene loading” where you can “slice” up your scene into lots of small, unrelated parts, and load those parts additively (i.e. stacking scenes on top of each other). This enables us to keep each scene file physically smaller, and that only one person would be working on that part of the scene at a time. However! It is not possible to have references live between the scenes, which may be problematic how we have BCI-Essentials set up. Example way to split up a “bigger” scene (like training) into the additive parts:
- We keep all of the “knowledge” required pieces in one place - e.g. the components responsible for BCIController and its inputs in one scene. Then we keep other things like background objects/look in another scene. We then put our training object (which doesn’t need to be selected) into a 3rd scene that can be interacted with separately.
- Make the game “playable” from every scene - meaning that any data that is requried from previously loaded scenes is mocked up if it is not available. Also, spawn objects that must persist between the scenes with a simple code like:
-
myObject = FindMyObjectInScene(); if (myObject == null) { myObject = SpawnMyObject(); }
## Art
**Get the scale right from the beginning**. Make art so that they can all be imported at a scale factor of 1, and that their transforms can be scaled 1, 1, 1. Use a reference object (a Unity cube) to make scale comparisons easy. Choose a world to Unity units ratio suitable for your game, and stick to it.
**Make and use test art**
- Squares labelled for skyboxes.
- A grid.
- Various flat colours for shader testing: white, black, 50% grey, red, green, blue, magenta, yellow, cyan. Gradients for shader testing: black to white, red to green, red to blue, green to blue.
- Black and white checkerboard.
- Smooth and rugged normal maps.
- A lighting rig (as prefab) for quickly setting up test scenes.
## General Practice